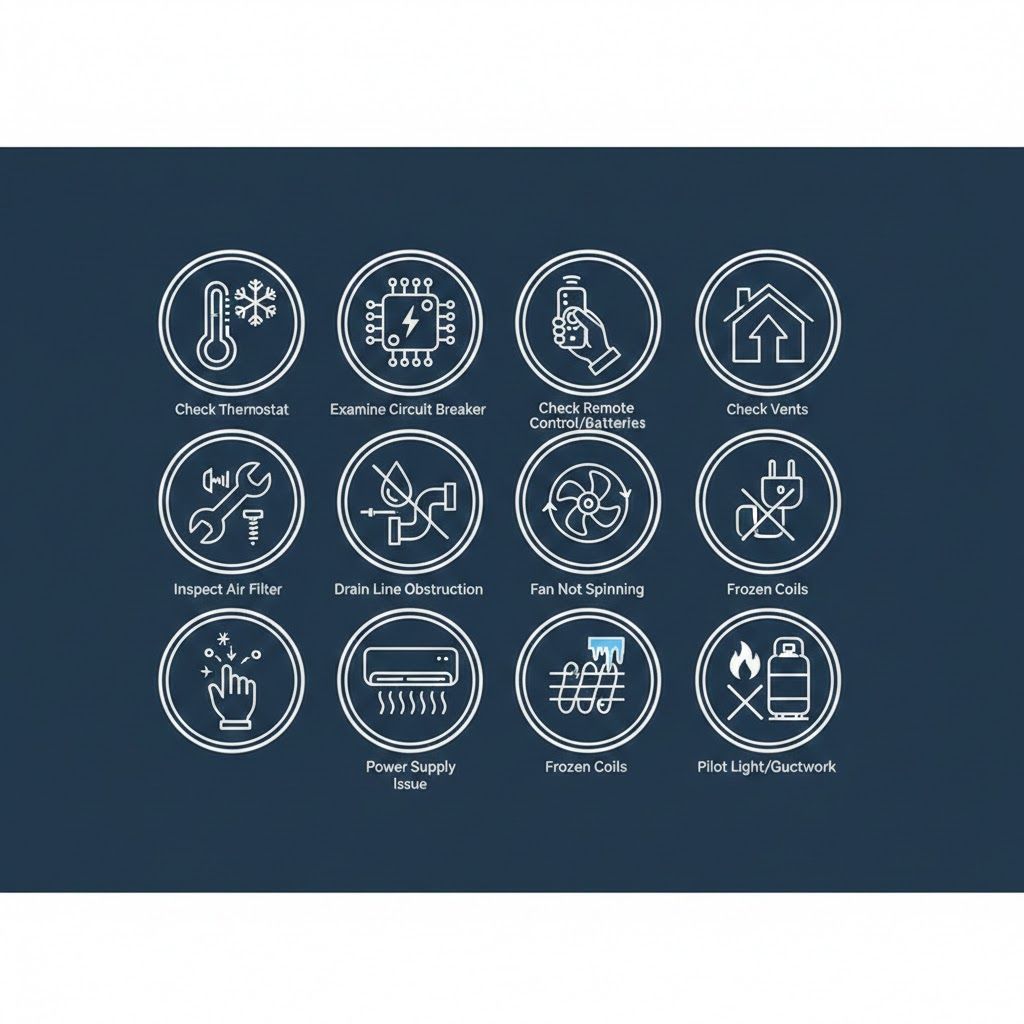
Top 12 Emergency HVAC Troubleshooting Tips
When your heating or cooling suddenly fails, the goal is to protect your home and family while you stabilize the system enough to avoid further damage. These 12 emergency HVAC troubleshooting tips walk homeowners through safe, practical steps you can take before calling a professional, along with clear red flags that mean you should stop and get help immediately.
1. Put Safety First Every Time
Any HVAC emergency starts with one priority: keep people and property safe. If you ever smell gas, burning plastic, electrical smoke, or see sparks or active water near electrical components, shut the system off at the thermostat and the circuit breaker immediately and leave the area until things are secure.
For gas furnaces, treat any suspected gas leak as an urgent hazard: do not try to relight anything, avoid flipping switches, evacuate the home, and contact your gas company or emergency services. Even in less dramatic situations, avoid removing panels or reaching into units if you are unsure what you are touching, since sharp metal, spinning fans, and high-voltage components are all present.
2. Check Your Thermostat Settings
Many “emergencies” turn out to be thermostat issues, so start with the simplest fix. Confirm the thermostat is set to the correct mode (Heat or Cool), the fan setting is appropriate (Auto is usually best), and the temperature setpoint is reasonable—at least a few degrees above room temperature for heat or below it for cooling.
If the display is blank or dim, replace the batteries in battery-powered models or verify the thermostat has power, as dead batteries can shut your system down entirely. You can also try a basic thermostat reset: power the system off at the thermostat and the breaker for about a minute, then restore power and re-enter your settings to clear minor glitches.
3. Confirm the System Has Power
If nothing runs—no fan, no compressor, no sounds—your next step is to verify that your HVAC system is actually receiving power. Go to your main electrical panel and look for breakers labeled “HVAC,” “Furnace,” “Air Handler,” or “AC.” If a breaker is tripped (lever in the middle), flip it fully to the Off position and then back to On once to reset.
Many systems also have a dedicated disconnect switch or service switch near the indoor unit and sometimes near the outdoor condenser, which can be accidentally turned off during cleaning or other work—make sure these are in the On position. If the breaker trips again after you reset it, do not keep resetting it; repeated trips usually indicate a short, motor problem, or other electrical fault that requires a professional.
4. Replace or Clean a Clogged Air Filter
A dirty air filter is one of the most common and easily fixable causes of emergency HVAC calls. When the filter is clogged, it restricts airflow, causing the system to overheat in heating mode or freeze in cooling mode, which can trigger automatic shutdowns or serious strain on components.
Pull the filter from its slot at the return grille, furnace, or air handler and inspect it against a light source; if you can’t see light through it, replace it with a new filter of the same size and type. During heavy use, checking monthly is a smart habit to prevent future breakdowns and to maintain efficiency and indoor air quality.
5. Inspect Vents and Registers for Blockages
Poor airflow is a frequent symptom in both heating and cooling emergencies, and blocked or closed vents are a surprisingly common cause. Walk through your home and confirm that supply registers are open and return grilles are not covered by furniture, rugs, or clutter.
Closing too many vents in unused rooms can increase system pressure and contribute to noise, duct leaks, or icing issues at the coil, so keep most vents at least partially open. If some rooms are still much hotter or colder than others even with vents open, note these locations for your technician, as uneven temperatures can point to duct issues, zoning problems, or airflow imbalance.
6. Look for Obvious Issues at the Outdoor Unit
Your outdoor condenser (for AC and heat pumps) needs plenty of airflow to operate properly. Check that the outdoor fan is running when the system is calling for cooling and that the unit is free of heavy debris such as leaves, grass clippings, plastic bags, or encroaching shrubs around the sides and top.
Clear any loose debris by hand and trim vegetation back at least a couple of feet so air can move freely through the coil. If you hear grinding, banging, or high-pitched squealing from the outdoor unit, or if the fan hums but does not spin, shut the system off and call a pro—continuing to run the unit can damage the compressor or fan motor.
7. Check the Condensate Drain and Pan
If your AC runs but suddenly stops, or you notice water around the indoor unit, a clogged condensate drain line might be the culprit. Many modern air handlers and furnaces include a float switch that shuts the system off when the drain pan fills to prevent water damage, which can make a clog look like a mysterious failure.
Locate the small PVC drain line near the indoor unit and look for visible blockages or kinks; if the condensate pan is accessible and full of water, carefully empty it and monitor to see if it refills. Homeowners with a wet/dry vacuum can sometimes clear shallow clogs by attaching the hose to the outside drain line and drawing the obstruction out, but if the clog is deep or recurring, it is best to schedule professional service.
8. Verify Gas Supply and Pilot or Ignition (For Furnaces)
For gas furnaces that suddenly stop producing heat, verify that the gas supply is available and any manual shutoff valves near the furnace are open (handle parallel to the pipe). Older systems may still use a standing pilot light, which can go out and prevent ignition; newer systems use electronic igniters and flame sensors that can fail or become dirty.
If your pilot light is out and your manufacturer’s instructions are accessible, you may relight it carefully, following each step exactly and ventilating the area first. If the pilot will not stay lit, if you smell gas, or if you are unsure which component you are touching, stop and call a licensed HVAC technician rather than risking a dangerous situation.
9. Listen and Look for Unusual Symptoms
Your senses are powerful diagnostic tools during an HVAC emergency. Pay attention to new noises such as rattling, banging, screeching, or rapid clicking, as these can indicate loose parts, failing motors, or electrical relay issues that should not be ignored.
In cooling mode, look for frost or ice accumulation on the refrigerant lines, outdoor unit, or indoor evaporator coil access panel; icing usually points to low airflow or low refrigerant and continuing to run the system can cause damage. Note when these symptoms started, whether they are constant or intermittent, and any recent changes you made (filter replacement, thermostat settings, new construction) so your technician can quickly narrow down the cause.
10. Try a Safe System Reset
Sometimes, especially after power blips or surges, your HVAC system’s controls can lock up and benefit from a controlled reset. To do this safely, turn the system off at the thermostat first so it isn’t calling for heating or cooling while you reset the power.
Next, switch the HVAC breaker to Off at the electrical panel and wait about one minute to allow internal electronics to discharge and reboot. Turn the breaker back On, wait another minute, then turn your thermostat back to Cool or Heat with a reasonable temperature setting, and give the system a few minutes to respond before assuming it still has a fault.
11. Stabilize Indoor Comfort While You Wait
In genuine emergencies—extreme heat or cold—it is important to protect people and property while you wait for professional help. In hot weather, close blinds or curtains to reduce solar gain, use ceiling and portable fans to move air, and encourage hydration and lighter clothing, especially for vulnerable occupants.
In cold conditions, close off unused rooms, use safe supplemental heat sources (properly vented space heaters and fireplaces, never ovens), wear layers, and keep pipes from freezing by opening cabinets and allowing faucets to drip slightly if temperatures are dangerously low. Temporary measures will not fix system issues, but they can buy time and prevent secondary damage while a technician is en route.
12. Know When to Stop DIY and Call a Professional
Effective emergency troubleshooting is as much about knowing where to stop as it is about knowing what to try. Once you have checked thermostat settings, power, filters, vents, drains, and obvious obstructions without resolving the issue—or if breakers keep tripping, components are icing over, or you hear alarming noises—continuing to experiment can turn a repair into a major replacement.
Call a licensed HVAC professional immediately if you notice burning smells, gas odors, visible arcing or sparking, repeated electrical trips, or significant water leaks, or if indoor temperatures reach unsafe levels (above roughly 95°F or below about 50°F). Before you call, write down the model numbers of your equipment, any error codes on displays, the timeline of symptoms, and what you have already tried; this information helps your technician arrive prepared and shortens your time without heating or cooling.
By following these 12 emergency HVAC troubleshooting tips, homeowners can often resolve simple issues on their own, avoid preventable damage, and communicate more effectively with professionals when a serious repair is needed.